The kitchen sink area often becomes a chaotic catchall for cleaning supplies, dishwashing tools, and random items. It’s one of those hidden spaces in your home that can quickly transform from a helpful storage spot to a jumbled mess. But with a little planning, you can turn this awkward area into an organized haven for all your cleaning essentials.
Organizing under your kitchen sink is simple when you use stackable containers, door-mounted racks, and clear bins to group similar items together. Start by emptying everything out, then add pullout drawers for dishwasher pods and scouring pads, use dollar store bins to corral spray bottles, and install hooks for hanging brushes and gloves. This approach maximizes every inch of space while keeping cleaning supplies visible and accessible.
In this article, we’ll explore foolproof strategies to make your under-sink area work better for your household. You’ll discover clever ways to work around pipes, how to create zones for different cleaning supplies, and budget-friendly storage solutions that turn this challenging space into an organizing win. These kitchen sink organization ideas will transform this often neglected area into one of the most functional spots in your home.
Setting the Stage for an Ordering Odyssey

Transforming the chaos under your kitchen sink starts with preparation and recognition of what you’re working with. A good organization system begins by assessing what you have and creating visual proof of your progress.
The Great Purge
Before tackling any under-sink organization project, you must first embrace the purge! Pull everything out from that dark cabinet abyss and lay it all on your kitchen floor or counter.
This is the moment of truth where you’ll need to make tough decisions about those 17 half-empty bottles of window cleaner. Be ruthless with your decluttering process and ask yourself:
- Does it work?
- Have I used it in the last year?
- Do I have duplicates?
- Is it expired?
- Do I even like this product?
Don’t forget to wipe down the empty cabinet while everything is out. It’s the perfect time to check for leaks and install shelf liner if needed.
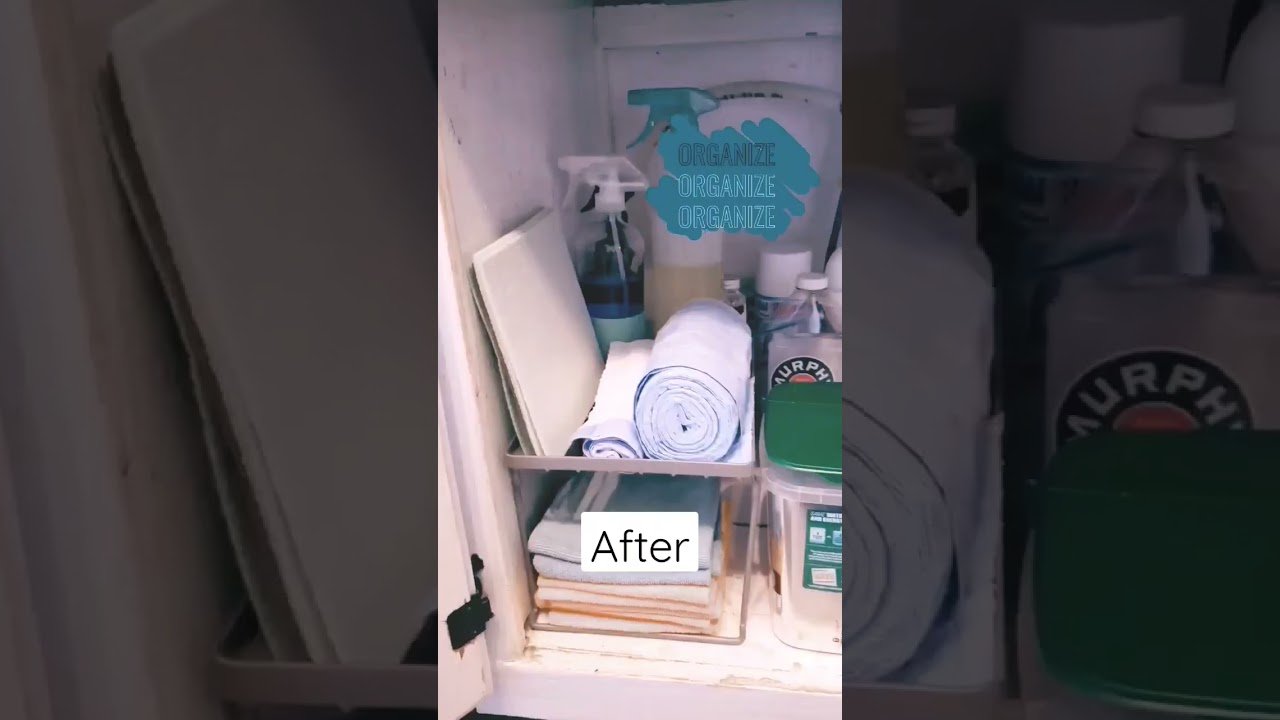
Before and After Comparison
Nothing motivates like visual evidence of your hard work! Take “before” photos of your messy under-sink area from multiple angles. These images serve as both documentation and motivation.
The “before” state usually shows a jumble of cleaning supplies, random items, and wasted space. You might spot stacks of dishwasher pods, sponges, and scouring pads all competing for the same area.
After implementing your organization system, snap “after” photos from the same angles. The transformation will be striking! Your newly organized cabinet should feature:
- Clear categories of items
- Visible labels
- Easy accessibility
- Maximized vertical space
- No more “product avalanche” when reaching for something
Many people find these comparisons so satisfying they become motivated to tackle other clutter-free projects throughout the home.
Enlisting the Right Tools for Tidy Triumphs
Getting your under-sink cabinet in order requires having the right organizational tools at your disposal. With smart storage solutions and clever gadgets, you can transform this often chaotic space into an efficient command center for all your cleaning needs.
Cleaning Crusaders
The battle against under-sink chaos begins with selecting the right containers to corral your cleaning products. Simple plastic containers with handles make excellent soldiers in your organization army, keeping frequently used supplies easily accessible.
Clear storage bins allow you to see what’s inside without digging around. Consider these options for maximum efficiency:
- Stackable drawers – Perfect for smaller items like sponges and brushes
- Turntables (lazy Susans) – Makes reaching back-corner items a breeze
- Pullout organizers – Brings everything into view with one smooth motion
Don’t forget to use shelf risers to create multiple levels of storage. These handy platforms help you see every supply at a glance, making quick clean-ups even quicker!
Creative Command Hook Utilization
Command hooks aren’t just for hanging pictures anymore—they’re secret weapons in the under-sink organization battle. These adhesive heroes stick to the inside of cabinet doors and walls without damaging surfaces.
Try these clever command hook hacks:
- Hang spray bottles by their triggers to free up valuable floor space
- Attach small baskets to hold sponges, brushes, and gloves
- Use adhesive hooks to keep trash bag rolls easily accessible
For maximum efficiency, place frequently used items at eye level. The under kitchen sink cabinet becomes dramatically more functional when vertical space is properly utilized.
Remember that hooks can be positioned strategically around pipes and disposal units. This makes use of awkward spaces that would otherwise remain empty and wasted. Your cleaning tools deserve a proper home—command hooks provide it!
Designing Your Under Sink Universe
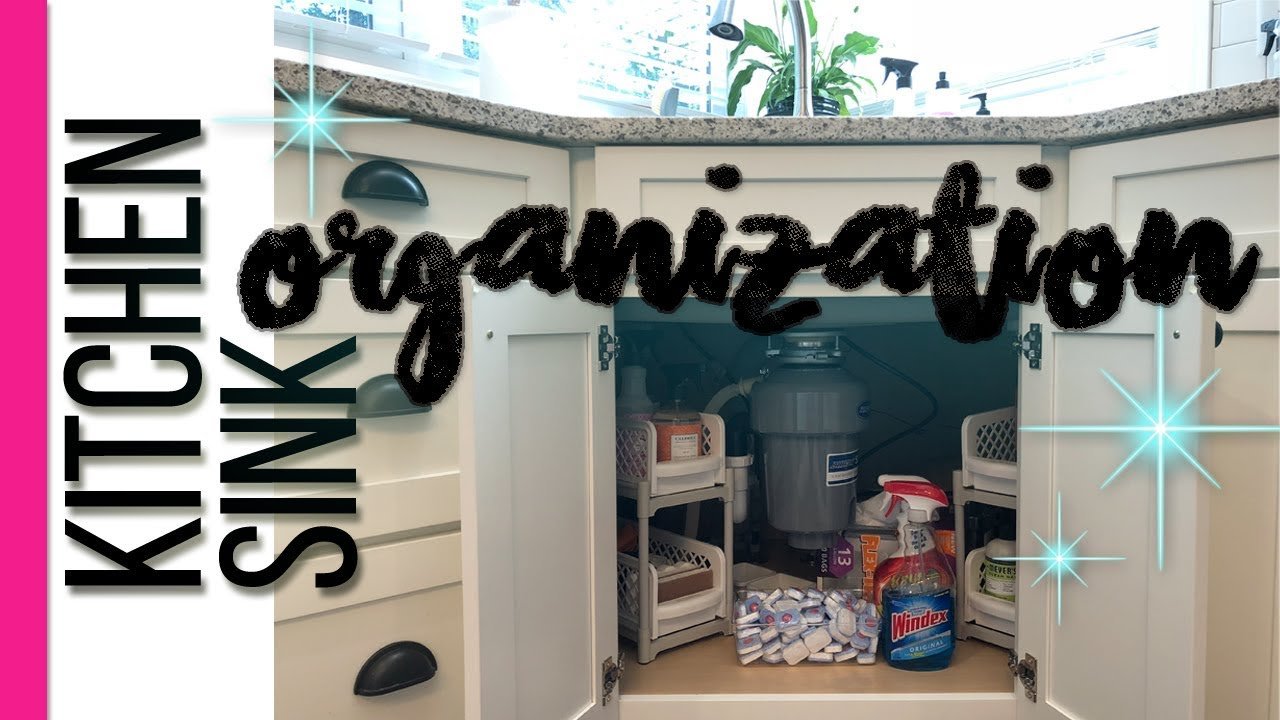
The space under your kitchen sink holds enormous potential for organization, even though it often becomes a chaotic cave of cleaning supplies. Creating a structured system here will save you time and frustration when tackling household chores.
Storage Solutions for a Serene Space
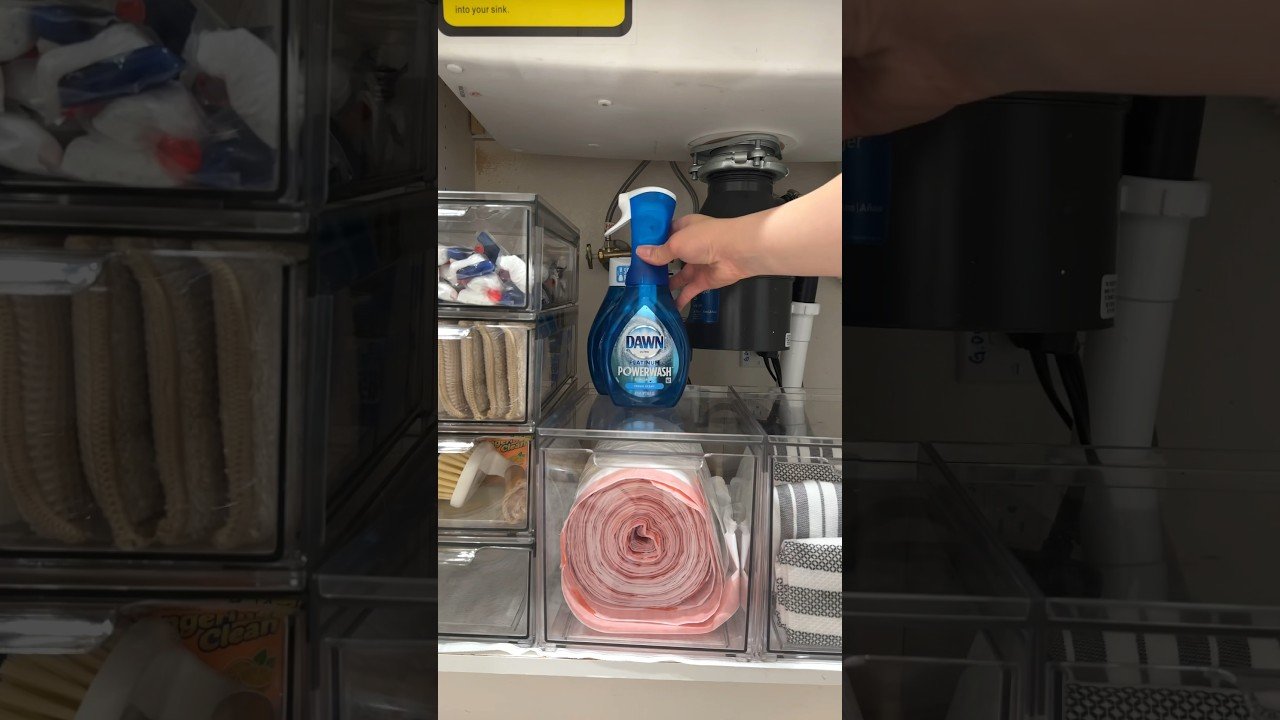
Turn your under-sink area into a well-ordered oasis with the right storage tools. Pull-out drawers work wonders for keeping frequently used items accessible. The top drawer can hold dishwasher pods, with lower drawers dedicated to sponges and scouring pads.
Clear plastic bins create instant organization zones while letting you see everything at a glance. Consider these affordable options:
- Labeled bins: Group similar items together (bathroom cleaners, kitchen sprays)
- Stackable containers: Maximize vertical space
- Tension rods: Perfect for hanging spray bottles
- Door-mounted organizers: Utilize previously wasted space
Dollar store bins can transform this space without breaking the budget! These inexpensive containers corral loose items and prevent the dreaded “avalanche” when reaching for supplies.
Kitchen Sink Organization Techniques
Start your organization journey by completely emptying the cabinet and wiping it clean. This gives you a fresh slate and helps you assess what actually belongs there.
Be ruthless in your assessment phase. That collection of half-empty bottles? Consolidate or toss them. Those specialty cleaners you haven’t used in years? Time to say goodbye!
Consider these practical techniques:
- Add a shelf liner: Protects against potential leaks
- Install a lazy susan: Perfect for corner access
- Use tiered shelving: Creates multiple storage levels
- Consider pull-out trash bins: Hides unsightly garbage
Arrange your most-used items at the front for easy access. That daily countertop spray deserves prime real estate, while the once-a-month oven cleaner can live in the back corner.
Ditching the Dreaded Kitchen Clutter

The space under your sink often becomes a wasteland of forgotten cleaning supplies and random items. Getting this area organized requires both a systematic approach and consistent maintenance habits.
52-Week Organized Home Challenge
The under-sink area is a perfect place to start your home organization journey. Many people tackle this space as part of a 30-day decluttering challenge or longer program.
Step 1: Empty Everything
Start by removing all items from under the sink. This gives you a clean slate and helps you see what you’re actually working with.
Step 2: Sort and Purge
Separate items into three categories:
- Keep (used regularly)
- Toss (expired or unused)
- Relocate (belongs elsewhere)
Step 3: Add Protection
Install a cabinet liner to protect against leaks and spills. This simple step will make future cleaning much easier.
Keeping It Clutter-Free
Once organized, maintaining that blissful clutter-free state requires some strategy. The key is creating systems that make it easy to keep things tidy.
Smart Storage Solutions:
- Use pull-out drawers for small items like dishwasher pods and sponges
- Install tension rods to hang spray bottles
- Add clear bins to group similar items together
Regular maintenance is crucial. Schedule a quick 15-minute review every month to remove unused cleaning supplies and reorganize as needed.
Consider adding drawer dividers or stackable shelves to maximize vertical space. This prevents items from being shoved to the back where they’re forgotten.
Maximizing Efficiency with Every Inch
Transforming the chaotic space under your kitchen sink into an organized oasis requires creative thinking and smart storage solutions. Let’s explore how to use every square inch to your advantage.
Space-Savvy Inspirations
The area under your sink is prime real estate for your cleaning supplies. Start by decluttering this space and removing items you rarely use. Keep only essential cleaning products that you reach for regularly.
Install a tension rod across the width of the cabinet to hang spray bottles. This clever hack frees up valuable floor space for other items. The bottles hang neatly, with triggers accessible for quick grabbing.
Clear plastic bins work wonders for categorizing similar items. Label them as “Bathroom Cleaners,” “Kitchen Sprays,” or “Dishwashing Supplies” to quickly find what you need.
Try these efficient storage solutions for maximizing space:
- Door organizers: Attach slim caddies to cabinet doors
- Stackable drawers: Perfect for sponges and small items
- Turntables/Lazy Susans: Great for corner access
- Pull-out systems: Bring everything into view with one motion
The Art of Maximizing Mini Manors
Even the tiniest under-sink areas can be transformed with the right approach. Consider the plumbing first—measure around pipes before purchasing any storage containers. This prevents frustrating returns of items that don’t fit.
Vertical space is your secret weapon! Stack containers when possible and use adjustable shelving that works around pipes. A simple wire shelf can double your storage instantly.
Think beyond traditional storage boxes. Repurpose shower caddies, file organizers, or even magazine holders to store cleaning supplies vertically. These unexpected solutions often fit perfectly in awkward spaces.
Create a cleaning caddy filled with your most-used supplies. This grab-and-go solution means you’re not digging through the cabinet each time you need to clean, saving precious minutes during your busy day.
Daily Maintenance for Dapper Domiciles
Keeping your under-sink area tidy doesn’t have to be a major project. With simple daily habits, you can maintain organization and prevent build-up of clutter where your cleaning supplies live.
Regular Revamping Routines
Daily maintenance starts with putting things back where they belong. After using any cleaning supplies, make sure to return them to their designated spots under the sink. This simple habit prevents chaos from creeping in.
Stackable drawers work wonders for daily organization. Keep frequently used items in the top drawer for easy access. No more rummaging around!
Try these quick daily habits:
- Wipe spills immediately to prevent sticky residue
- Check product levels so you’re never caught without essentials
- Close all caps tightly to prevent leaks
- Keep a small trash bag for empty containers
A container for paper towels keeps them from unraveling everywhere. Consider a small wall-mounted holder inside the cabinet door—genius space-saving trick!
Spotless in a Swipe
Quick cleaning sessions keep your under-sink area fresh. Once a week, take a disinfectant wipe and clean the cabinet floor where droplets might have landed.
Dollar store bins make swiping sessions super easy! Keep a small bin with essential daily cleaners right in front so nothing gets forgotten.
Don’t forget about your garbage disposal cleaner! Keep those pods or tablets in a small sealed container to prevent moisture damage. A weekly treatment keeps smells at bay.
Tuck a microfiber cloth under the sink for quick cleanups. This prevents small spills from becoming sticky messes that attract dust and grime.
Create this simple daily checklist:
| Time | Action | Benefit |
|---|---|---|
| Morning | Quick visual check | Spot problems early |
| After cleanup | Return all supplies | Maintains order |
| Weekly | Wipe down surfaces | Prevents buildup |
| Monthly | Check expiration dates | Keeps supplies fresh |
Celebrate Your Clean Sweep Success

Congratulations! You’ve conquered the chaos under your kitchen sink. Take a moment to appreciate your newly organized under-sink space. It’s not just about cleanliness—it’s about making your daily life easier.
Snap a quick “before and after” photo to remind yourself how far you’ve come. Many people forget this step, but seeing the transformation can be incredibly satisfying and motivating for future organizing projects.
Consider giving yourself a small reward for completing this task. Maybe it’s enjoying a favorite beverage in your newly organized kitchen or treating yourself to a fresh-scented cleaning product that you’ll look forward to using.
Benefits of Your Organized Sink Cabinet:
- Less stress when looking for supplies
- Faster cleaning sessions
- Prevention of leaks and damage
- More efficient use of space
- Extended life of your cleaning products
The beauty of proper sink organization is that it makes maintaining cleanliness so much easier going forward. With everything in its designated spot, your future self will thank you each time they reach for a cleaning product.
Remember that maintaining your organized space requires occasional check-ins. Schedule a quick 5-minute review once a month to ensure everything remains in its proper place. This small habit prevents the return of under-sink chaos.
Your decluttering victory might seem small, but it represents something bigger—taking control of your space and creating systems that serve you better. Now whenever guests compliment your tidy home, you can smile knowing even your hidden spaces are perfectly organized!
Frequently Asked Questions
Getting your under-sink area organized can seem like a puzzle. Here are answers to common questions about taming that wild space and making the most of storage solutions for your cleaning supplies.
What are some creative DIY hacks for tidying up that wild jungle under the sink?
Turn tension rods into instant dividers for spray bottles! Install them horizontally and hang cleaners by their triggers to free up floor space below.
Use command hooks on cabinet doors or walls to hang dustpans, small brushes, and microfiber cloths. This keeps them accessible without taking up precious shelf space.
Repurpose shower caddies as portable cleaning supply organizers. They have built-in compartments perfect for grouping similar products together and can be easily removed when needed.
Try using a lazy susan to make reaching items in the back much easier. No more knocking everything over while searching for that one cleaner hiding in the depths!
Got a garbage disposal? How can you juggle space to keep it and your cleaners organized?
Work around the disposal pipes with stackable drawers that can be configured to fit your specific layout. Look for narrow options that maximize vertical space while allowing room for plumbing.
Use the door space! Mount a small basket or caddy on the inside of the cabinet door to hold garbage disposal tablets, brushes, and other sink-cleaning essentials.
Consider U-shaped shelving units designed specifically to work around pipes. These clever shelves wrap around plumbing while still providing usable storage surface.
Clear plastic bins help contain similar items while allowing you to see what’s inside. Label them “Sink Cleaners,” “Dish Supplies,” and “Garbage Disposal Care” for quick access.
Is IKEA the secret treasure trove for under-sink organization, and what are their must-haves?
IKEA’s VARIERA series offers plastic bins in various sizes that slide neatly into cabinets and around pipes. Their ventilated design prevents moisture buildup—perfect for under sinks!
The OBSERVATÖR cross-braces create instant shelving in any cabinet. They install without screws and provide adjustable support for adding an extra level of storage.
Don’t overlook IKEA’s door organizers like RATIONELL or BEKVÄM. These attach to cabinet doors for storing smaller items like sponges, brushes, and dishwasher tablets.
Their SAMLA clear boxes come with lids—ideal for containing potentially leaky cleaning products and protecting your cabinet from spills and stains.
Storage ideas, assemble! Can you share your top organization tips for a clutter-free under-sink cabinet?
Group like items together in dedicated containers—dish soaps in one bin, surface cleaners in another. This prevents the dreaded “cleaner avalanche” when reaching for something.
Pull-out drawers are game-changers for under-sink storage. They slide forward to eliminate awkward reaching and make every inch accessible.
Consider a tiered shelf system to maximize vertical space. Lower items can sit under the pipes while taller bottles fit nicely on either side.
Create an “everyday essentials” zone near the front with items you use daily. Reserve the back areas for less frequently used supplies or bulk refills.
How can I make the Dollar Store my secret weapon for organizing cleaning supplies under the sink?
Plastic baskets from dollar stores are perfect for corralling similar products. Get different colors to create a visual organization system—blue for dishwashing supplies, green for eco-cleaners, etc.
Look for small drawer organizers to separate scrubbers, sponges, and brushes. These affordable containers keep small items from getting lost in the shuffle.
Adhesive hooks cost just a dollar but provide valuable vertical storage. Stick them inside cabinet walls to hang gloves, brushes, or even lightweight spray bottles.
Stackable containers are dollar store gems for maximizing space. Use them to create mini-shelves for shorter items like dishwasher pods or extra sponges.
Is pull-out storage the magic solution for keeping the under-sink chaos under control?
Pull-out organizers are indeed magical space-savers! Two-tier models work especially well, allowing you to organize items by frequency of use or type of cleaner.
The sliding action eliminates the frustration of rummaging blindly in the back of the cabinet. Every item becomes visible and accessible with a simple pull forward.
Look for pull-out systems specifically designed to navigate around pipes. Many feature customizable shelving that can be adjusted to accommodate your plumbing layout.
These organizers typically install with just a few screws, making them a relatively simple weekend project with impressive organization results. Your future self will thank you!